
How To Set up a Drip Irrigation System

Our neighbor not too long ago requested for assist including a drip irrigation system to their new backyard. My final expertise with a DIY irrigation set up was fairly intense, so I used to be cautious. However putting in drip irrigation was the full reverse. It was straightforward, reasonably priced, and quick. Plus, it solely price round $75 and took only a few hours to put in. It’s additionally a way more environment friendly option to water your crops than conventional sprinklers – so there’s loads much less water waste.
Drip irrigation methods could be put in proper onto a typical out of doors spigot, so no particular tools or plumbing expertise is required. They’re nice for flower beds, vegetable gardens, shrubs, and even massive timber since you get exact management of the quantity of water that every plant receives.
What’s Drip Irrigation?
Drip irrigation is a straightforward & environment friendly methodology for watering crops in gardens, mulch beds, containers, and extra. Not like sprinkler irrigation, which is used for lawns, drip methods ship water on to the soil on the base of every plant by way of sluggish, low-pressure hoses. This has a number of benefits:
- Much less wasteful: Much less water is misplaced to evaporation, overspray, and runoff than with sprinkler methods. Drip irrigation methods are mentioned to make use of as much as 50% much less water!
- Extra environment friendly: Exact watering to the plant’s root zone means shorter, simpler watering occasions.
- Extremely customizable: Versatile hoses and a wide range of emitters make it straightforward to get every plant precisely the water it wants.
- Simple to put in: Requires no particular instruments, plumbing data, or earlier expertise. You may add a whole system in simply a few hours!
- Inexpensive: This $55 drip irrigation package has every part you want (simply add a hose timer!).
They’re additionally a extra sturdy, everlasting, and focused answer than soaker hoses. These are good for fast, low-effort set-ups in the event you’re getting new plantings established, however soaker hoses are inclined to deteriorate over time. So as soon as once more, a drip irrigation system wins!
So let this be your signal to drop no matter excuses you’ve been utilizing to place off putting in a drip system in your backyard or yard. I do know I’m kicking myself for not doing it sooner. Sure, I’m including one to our home due to the simplicity and effectivity of the setup that I did for our neighbors.
How Does A Drip Irrigation System Work?
Drip irrigation methods use a sequence of hoses, versatile tubing, connectors, and emitters to move a sluggish circulate of water to your out of doors crops. Whereas conventional garden irrigation makes use of high-pressure water to activate sprinklers that may spray lengthy distances, drip methods principally simply, properly, drip. Listed below are the important thing parts, all of that are included in this drip irrigation package (aside from a hose timer).
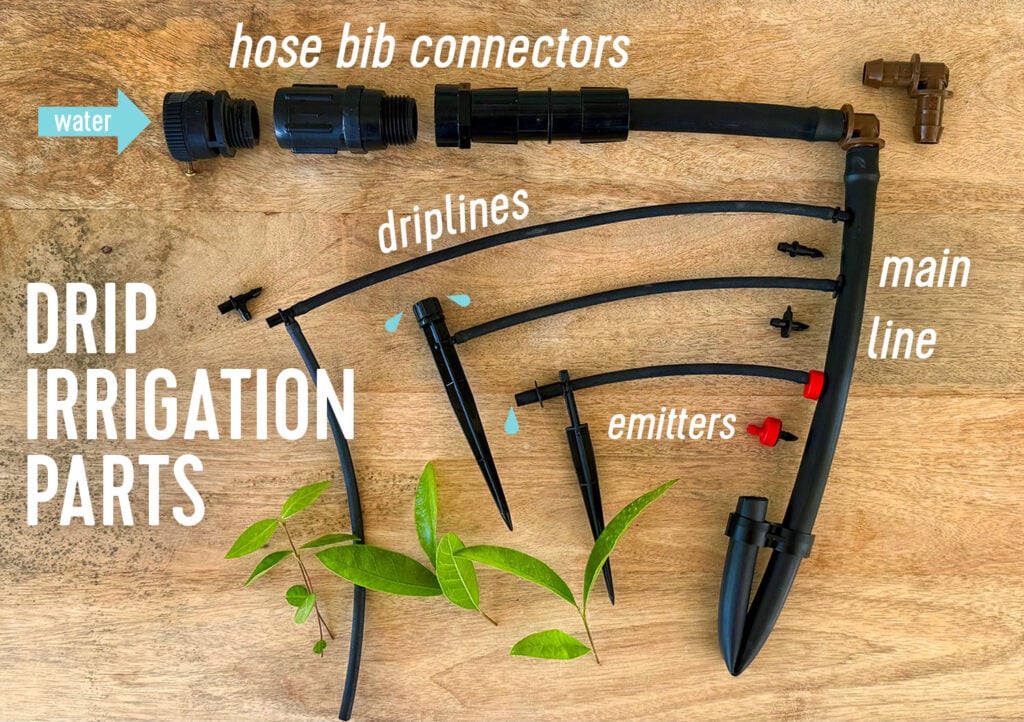
This put up is just not sponsored in any method. We have been simply very impressed with the convenience of the drip irrigation package… and it solely price $55! And if you add in a hose timer, which is the one different part you want if you would like this to run on autopilot as an alternative of manually, it nonetheless clocks in round $75, all in!

Drip Irrigation Tutorial Video
Within the video beneath, we take you thru all the components of the drip system. You can even learn the directions beneath the video.
Be aware: You can even watch this video on YouTube.
Hose Bib Connectors
As I defined within the video above, you’ll be able to hook up a drip irrigation system to any out of doors spigot or hose bib, however there are a couple of essential objects to make this connection. Every little thing within the listing beneath is included within the the drip irrigation package aside from the hose timer, so shopping for supplies for this whole mission is very easy.
- Timer (not pictured): A sprinkler timer helps you schedule common, automated watering. You can even purchase a multi-zone timer to create separate schedules for various areas of your yard or a sensible timer to program out of your telephone.
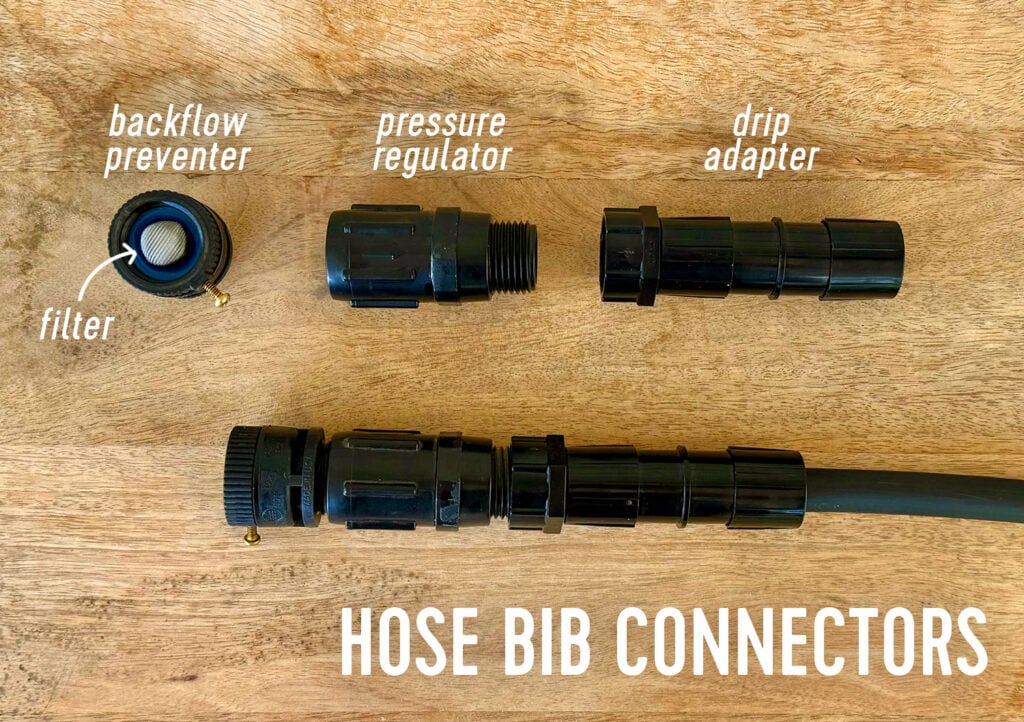
- Backflow Preventer: This retains water in your irrigation strains from flowing again into the municipal water provide, ought to there ever be a drop in strain on their finish. That method, potential contaminants in your yard (fertilizers, pesticides, and so forth) don’t get within the native consuming water.
- Filter: A small mesh filter (often included within the backflow preventer) retains particles like sand and rust from clogging your strains
- Strain Regulator: This helps scale back and stabilize the water strain out of your hose to a decrease, constant circulate that’s extra appropriate for drip irrigation.
- Drip Adapter: Lastly, this connector means that you can connect 1/2″ or 5/8″ irrigation hose to a regular 3/4″ hose bib.
As soon as once more, all of those items (aside from the timer) are included within the package. I cherished how easy it was to only seize two issues and be capable to do that complete mission myself in a couple of hours. When you’re establishing a number of zones, you should buy further connection kits that embody all the items linked above.
Fundamental Line
The vast majority of a drip irrigation system is a sequence of versatile hoses that may be organized to suit your house. The “essential line” transports water out of your spigot all through your backyard (to not particular person crops), kind of like how a water essential runs by way of your metropolis or neighborhood (to not particular person homes).
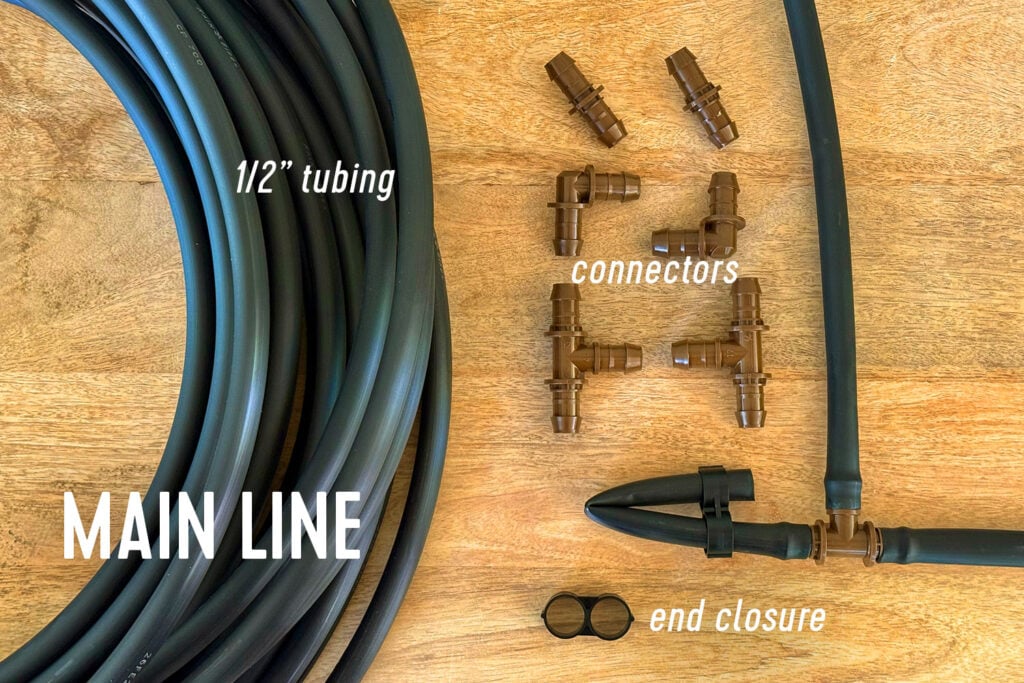
- 1/2″ Tubing: This 1/2″ polyethylene tubing – generally known as flex pipe or “humorous pipe” – is bought in numerous lengths. It may be reduce utilizing family scissors.
- 1/2″ Connectors: These join sections of essential line tubing and are available a wide range of shapes (tees, elbows, and so forth) so you’ll be able to match the form of your house. Merely push the tubing onto the barbed ends to safe it.
- 1/2″ Finish Closure: These finish closure rings pinch the open finish of your essential line closed.
Driplines
From the primary line, a wide range of smaller, versatile driplines department off to the person crops. Consider these just like the distinctive water strains that join particular person properties to the municipal water essential.
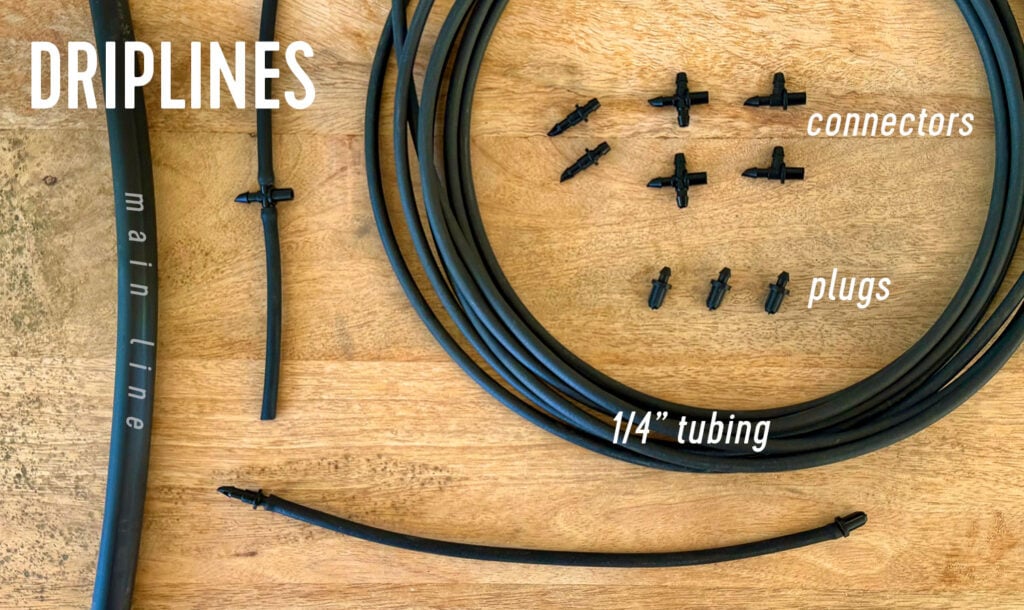
- 1/4″ Tubing: Additionally known as distribution tubing or “spaghetti pipe,” it is a smaller, versatile hose that can be reduce utilizing scissors.
- 1/4″ Connectors: These barbed connectors are much like these for the 1/2″ tubing, however are additionally used to attach every dripline into the primary line. You do that by puncturing one barbed finish by way of the aspect of the primary line.
- Goof Plugs: These are barbed endcaps that can be utilized to plug any open ends of 1/4″ tubing. They can be used for any small puncture in your 1/2″ essential line.
Emitters
Emitters are the small gadgets in your driplines that decide how (and the way a lot) water is delivered to every plant.
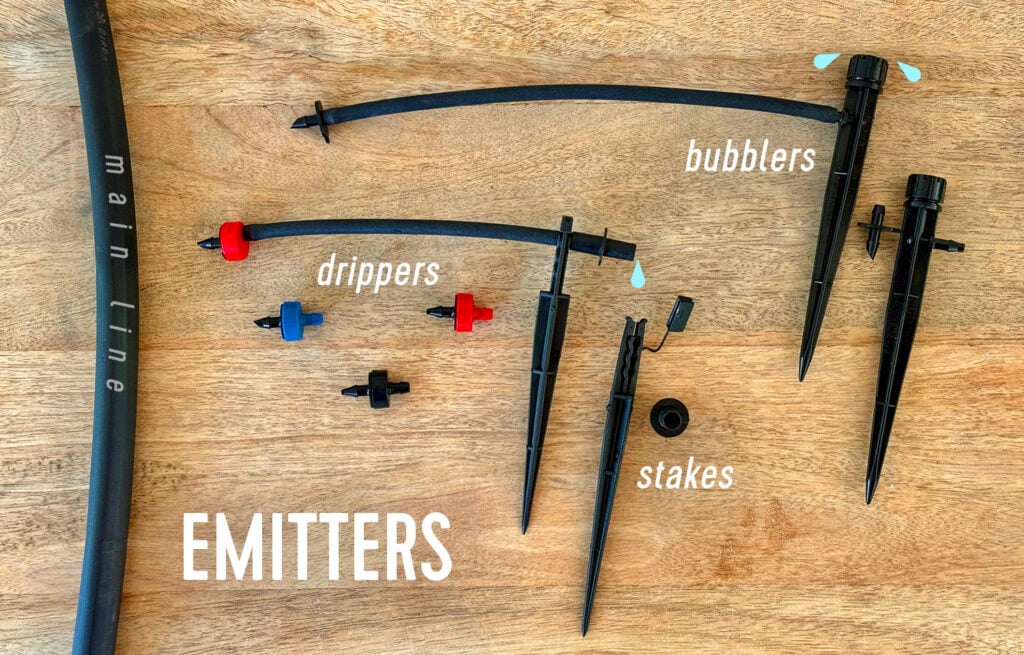
Listed below are some widespread sorts of emitters:
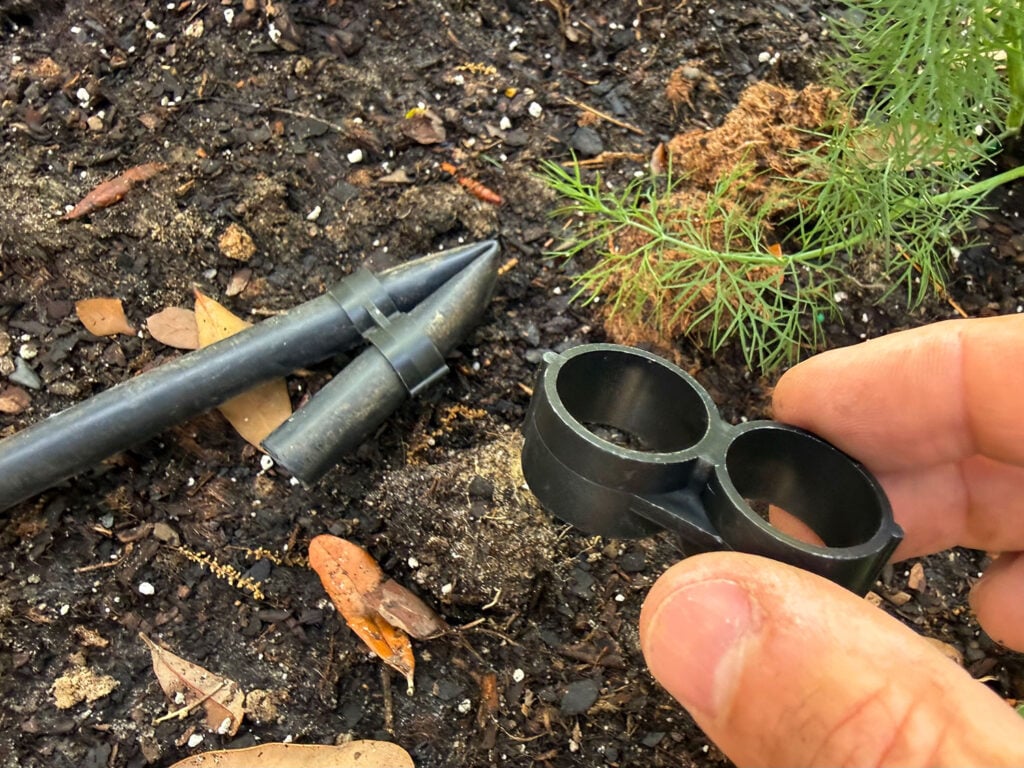
- Drippers: These are the commonest emitters in a drip system. They’re put in in the beginning or in the midst of the dripline and management the discharge of water to a constant drip. Completely different colours point out totally different circulate charges measured in gallons per hour (GPH). Commons speeds are 0.5 GPH, 1 GPH, 2 GPH, and 4 GPH.
- Tubing Stakes: These clips maintain the ends of your driplines so you’ll be able to stake them precisely the place you need them.
- Bubblers: These connect to the top of a dripline and emit 8 small streams of water in a good circle, reaching a small cluster of crops.
- Sprayers (not pictured): These emitters are closest to a conventional sprinkler, with a sprig head positioned on a raised stake. Bought in full circle, half circle, and quarter circle varieties.
And that, of us, are all the key items that go right into a DIY drip irrigation system.
Steps To Set up A Drip Irrigation System
Now that you just perceive the components of your drip system, placing all of it collectively could be very simple.
- Plan Your Format
- Collect Provides
- Give Your Tubes Some Solar
- Connect Timer & Hose Connectors
- Run The Fundamental Line
- Join Driplines & Emitters
- Take a look at & Program Timer
Step 1: Plan Your Format
An essential first step is planning how one can lay out your drip irrigation system. They’re fairly straightforward to regulate as you go, however having a normal plan ensures you’ll have sufficient provides. Vital items of data are:
- The place is my water supply?
- What number of zones do I would like on my timer?
- Are there any obstacles (decks, sidewalks, fences) I must plan for?
- What number of crops am I attempting to succeed in?
- Do some crops want extra water than others?
- What sorts of emitters do I need?
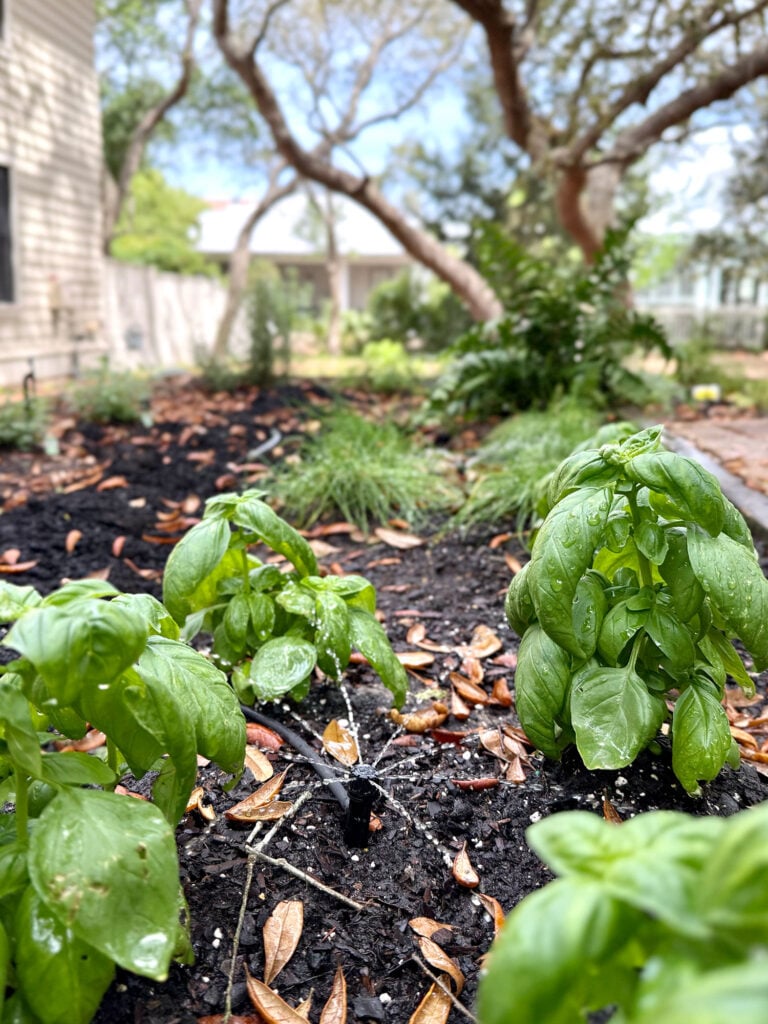
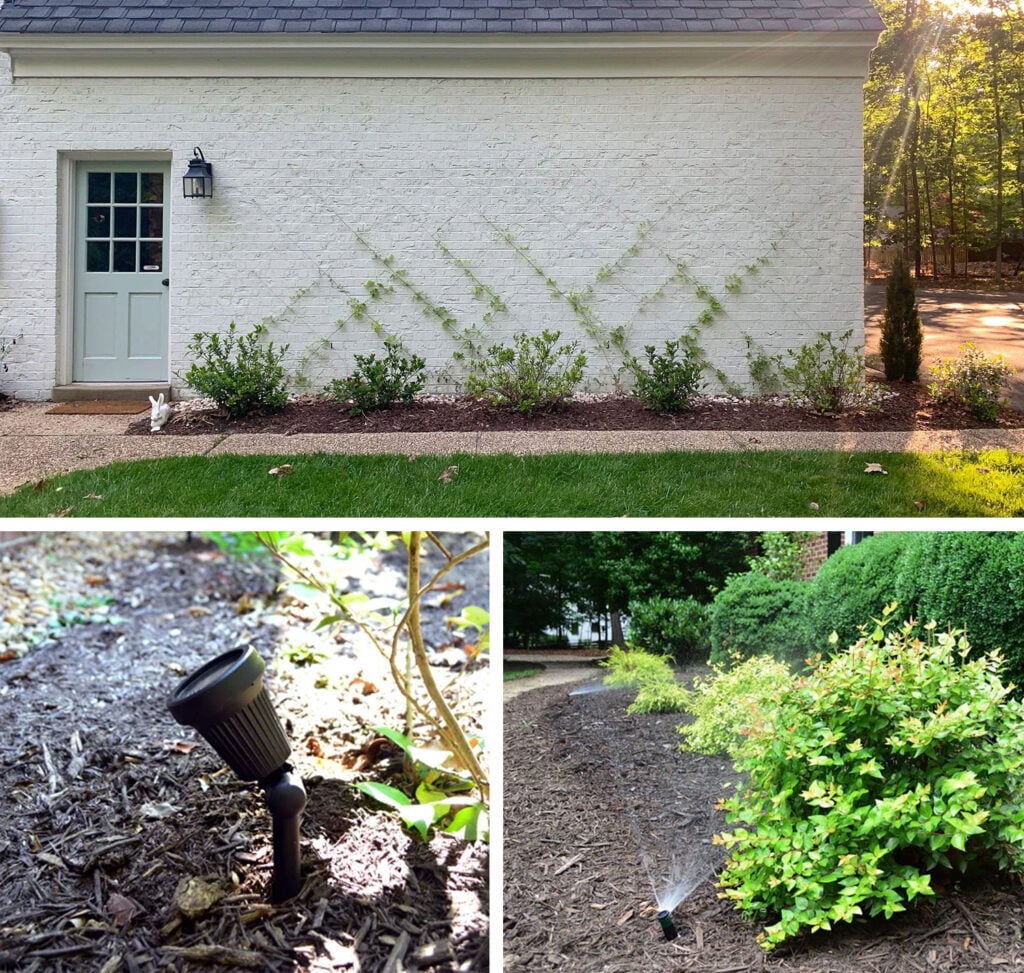
For reference, right here is the house we needed to water. That is my pal’s yard. He requested for my assist putting in irrigation to their new herb backyard.
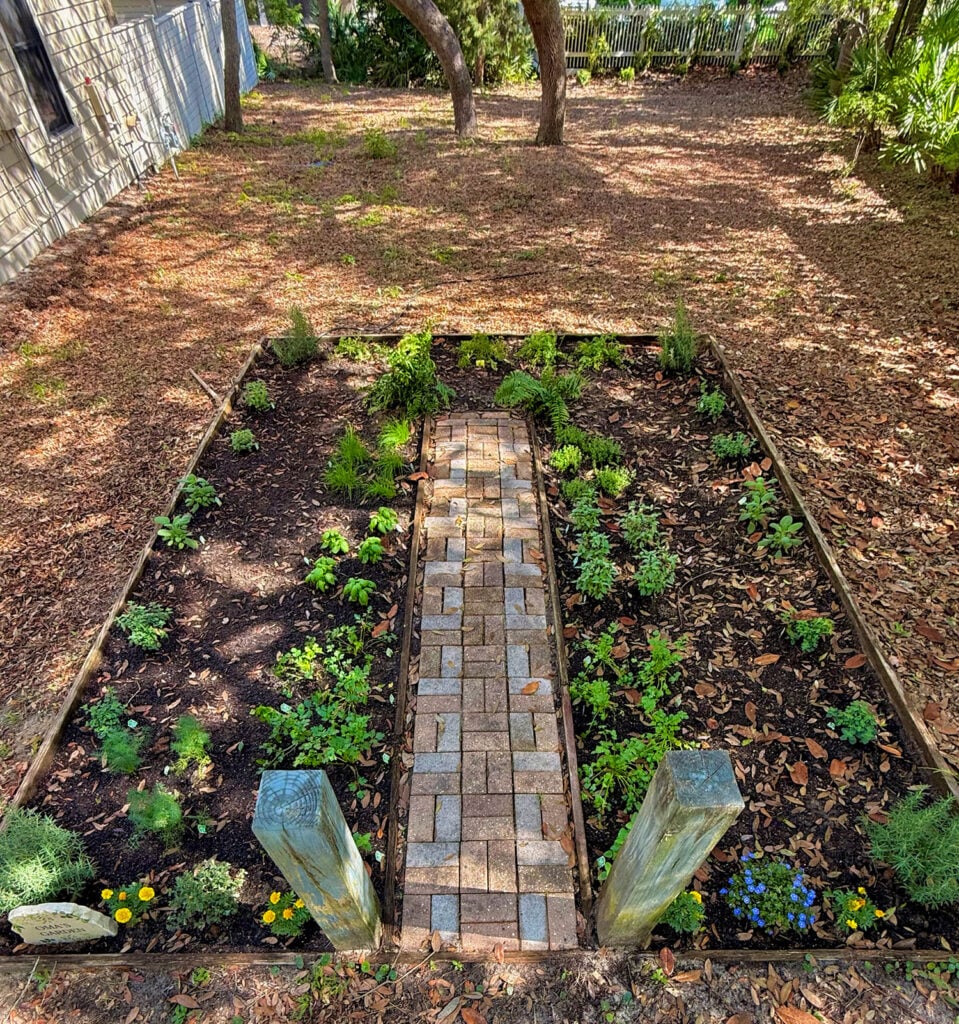
And here’s a tough map (with key!) of how we laid out his drip system utilizing the supplies within the package (we did purchase some additional bubblers too – they’re about $1.50 every). We relied totally on sprayers and bubblers, after which stuffed in with drippers for any crops that we felt weren’t getting sufficient spray.
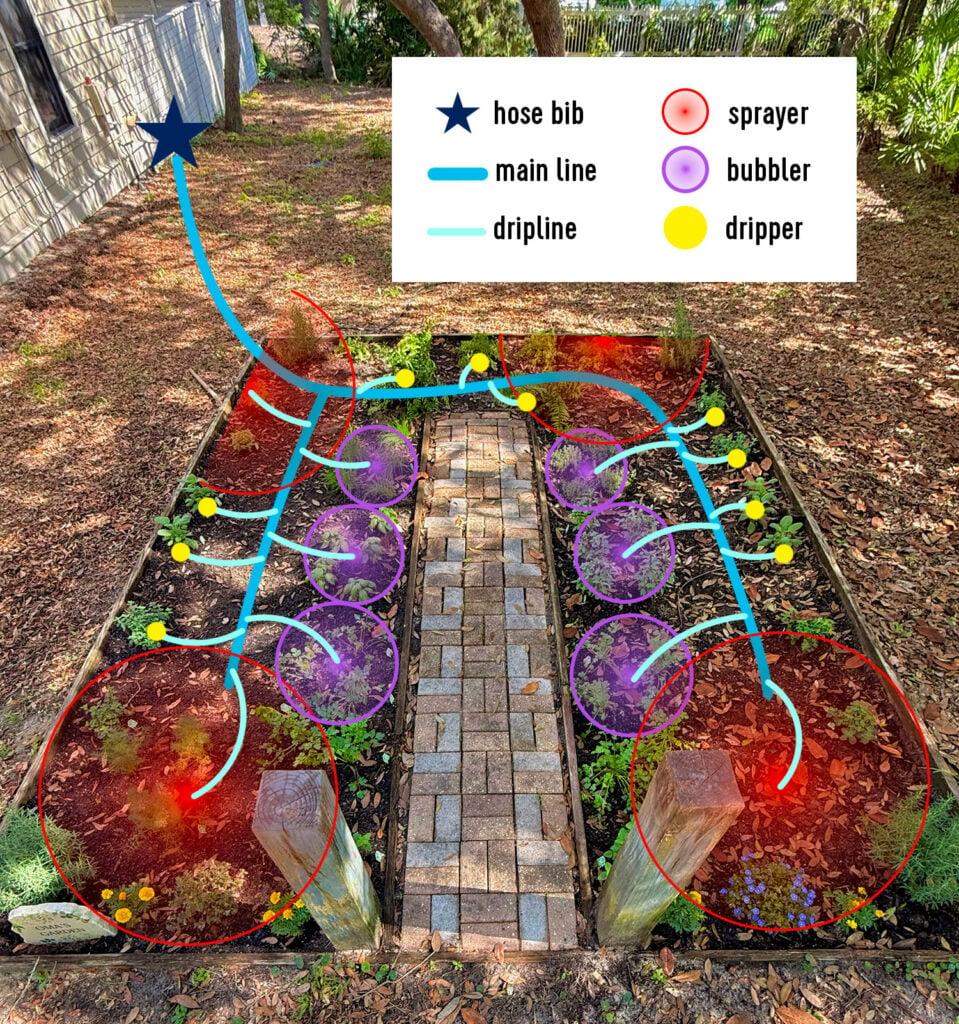
The package additionally consists of guides with suggestions for layouts in addition to watering occasions & frequencies.
Step 2: Collect Provides
Once more, buying this drip irrigation package and a hose timer could also be all you might want to set up your system. However listed below are some conditions which will require further supplies:
- When you’re creating a number of zones, you’ll want further hose connectors (backflow preventers, strain regulators, and so forth) for every zone.
- In case your water supply is much out of your crops, you could want further coils of 1/2″ tubing and connectors. The package consists of 50 toes.
- When you’ve got numerous crops, you could want further 1/4″ tubing, emitters, or stakes.
- Additionally, you might have considered trying/want further emitters ( the package consists of 20 drippers/stakes, 2 bubblers, and 4 sprayers).
The excellent news is that almost all emitters and connectors are very reasonably priced (often only some bucks). The costliest provide will in all probability be your timer. Our neighbor opted for a a 4-zone timer, which price $60. Greater than the irrigation package itself! However a easy hose timer like this is able to do the trick properly in the event you’re simply including one zone that you just need to water (for instance, a aspect backyard or a entrance landscaping border).
Step 3: Give Your Tubes Some Solar
This sounds foolish, however earlier than you start assembling something, lay your tubing out within the solar for about an hour. The warmth makes the tubes just a little extra malleable, which can make all of these strain connections simpler in your fingers.
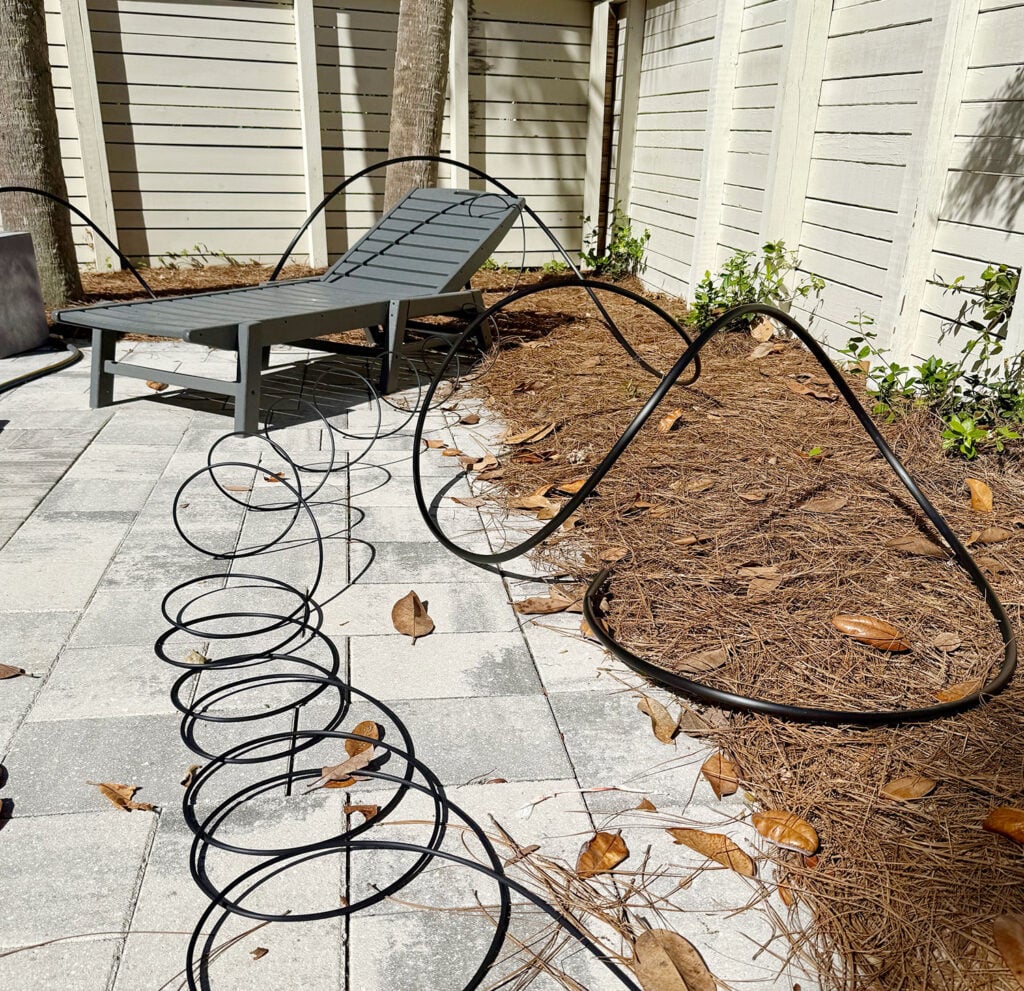
That is additionally a great time to begin laying out your emitters, digging any holes or trenches you need to create, or getting began on the following step…
Step 4: Connect Timer & Hose Connectors
As I described within the video, you need to begin by connecting the items to your spigot or hose bib. This consists of your timer, backflow preventer (with filter), strain regulator, and drip adapter. Screw every part collectively and hand-tighten it. You may verify for leaks as soon as your system is totally connected.
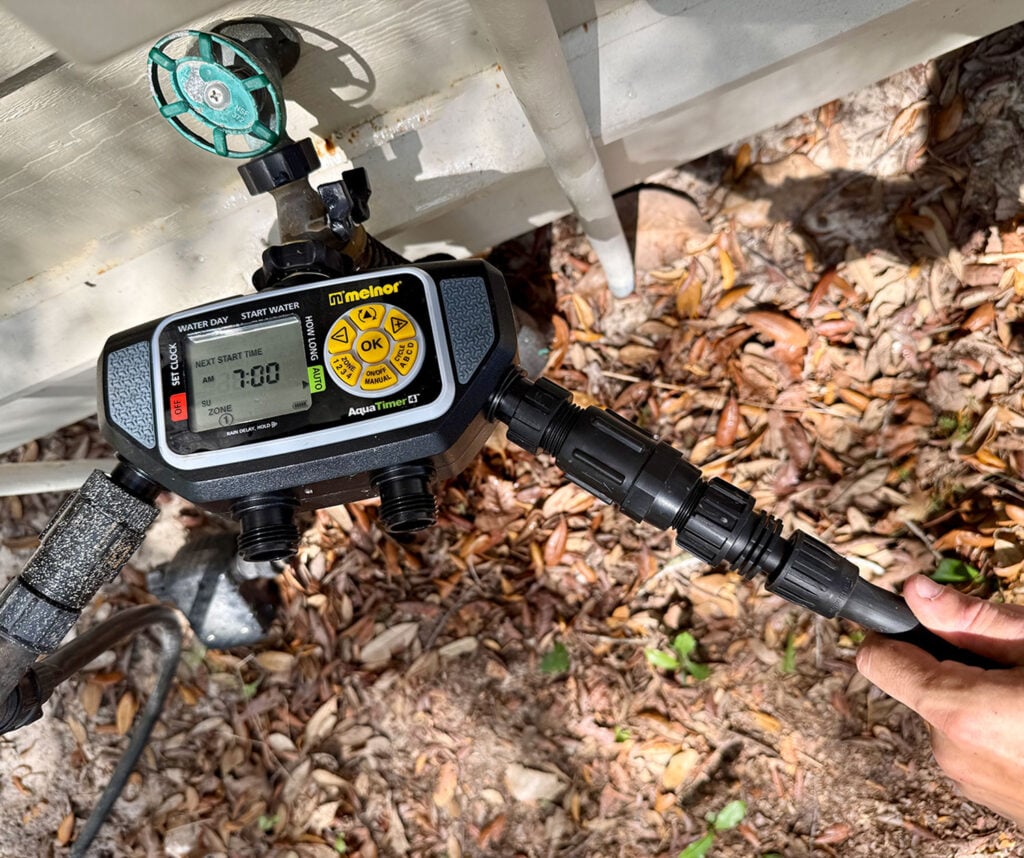
Once you’re prepared, you may also connect one finish of your 1/2″ essential line tube to the drip adapter. Relying in your adapter, it ought to connect with strain and a small twist.
Step 5: Run The Fundamental Line
Subsequent, run your 1/2″ tubing out of your water supply to and all through the primary areas that you can be watering. It doesn’t must run proper up towards your crops, simply inside a couple of toes of them, ideally. Use barbed connectors to separate or flip your line as wanted. Simply push the tube onto the barbed finish to attach it.
Make sure to clamp any ends of your essential line tube closed with these ring closures. The package consists of 2 of those, so you could must buy extra in the event you cut up your essential line in additional than 2 instructions.
And when it comes time to shorten your essential line, simply reduce off the surplus. You should buy a particular tube cutter, however I discovered family scissors labored nice.
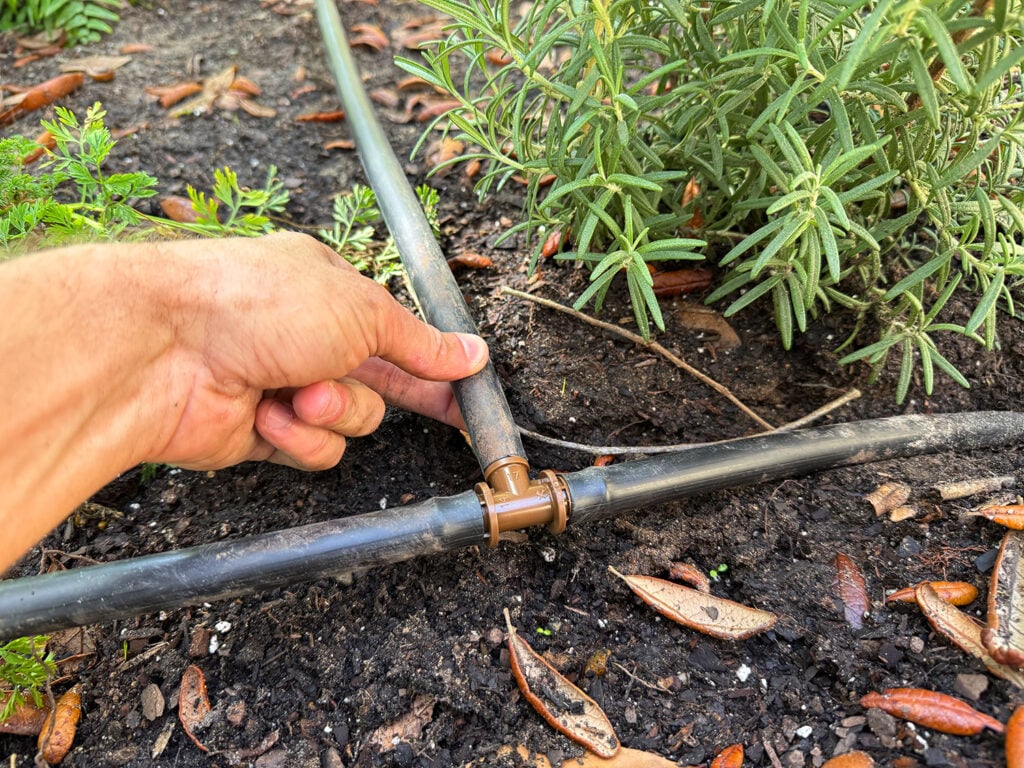
Step 6: Join Driplines & Emitters
Subsequent, you’ll be connecting driplines (1/4″ tubing) into the aspect of your essential line (1/2″ tubing) close to wherever you’ll be inserting an emitter. Various kinds of emitters could require totally different connections, so don’t begin making holes all willy-nilly.
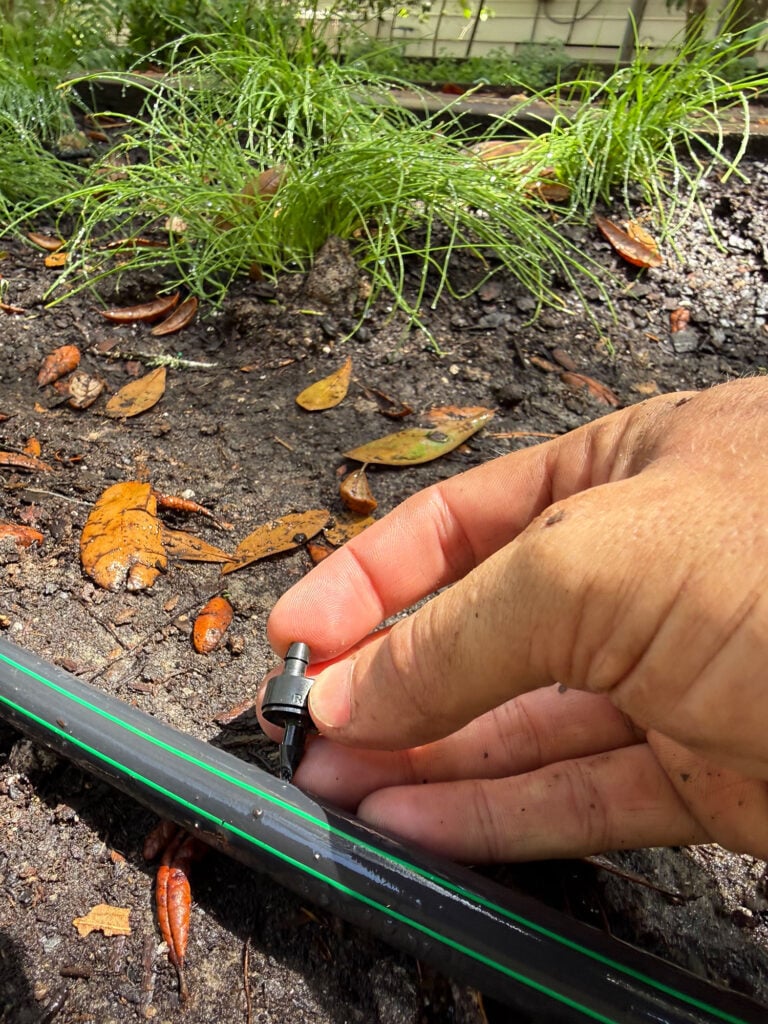
The bubblers and sprayers on this package got here with the right barbed connectors connected. Simply use strain to puncture them into the aspect of your essential line. The package did embody a software to assist with this, however I didn’t use it a lot.
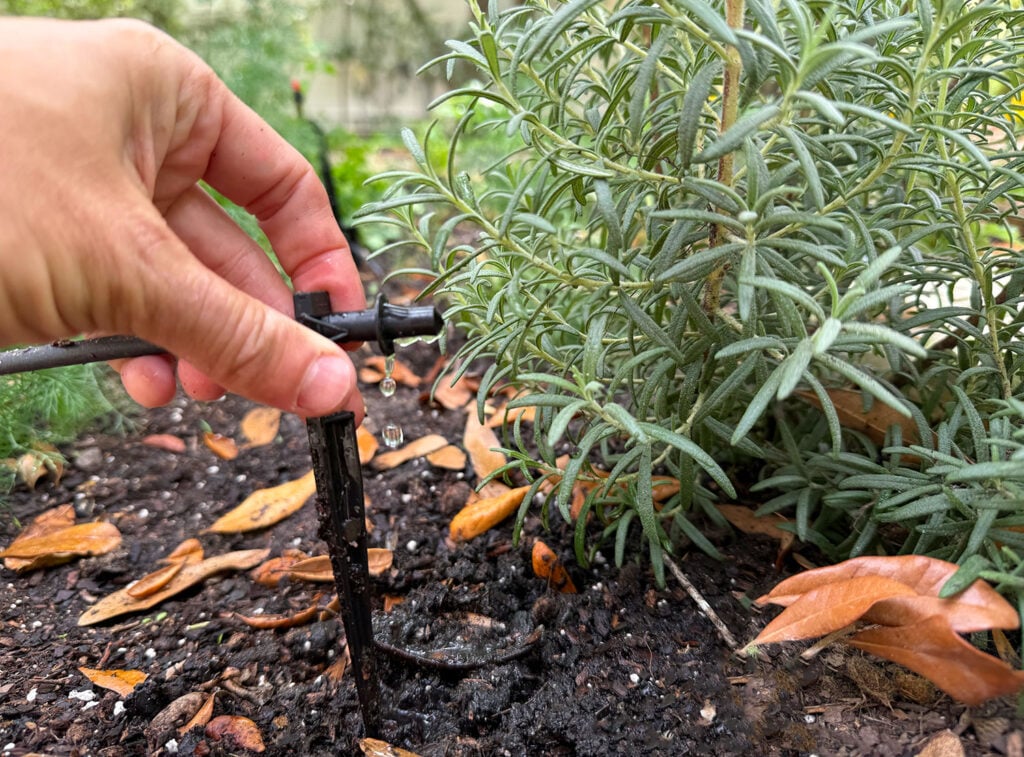
For many drippers, you’ll poke them immediately into the primary line after which connect your 1/4″ tubing to the opposite finish. In case your dripline is sort of lengthy, nonetheless, it’s beneficial that you just set up the dripper someplace throughout the dripline (ideally inside 5ft of the plant). Simply reduce the tube utilizing scissors and fasten the dripper between the reduce ends, ensuring the right finish faces the water supply.
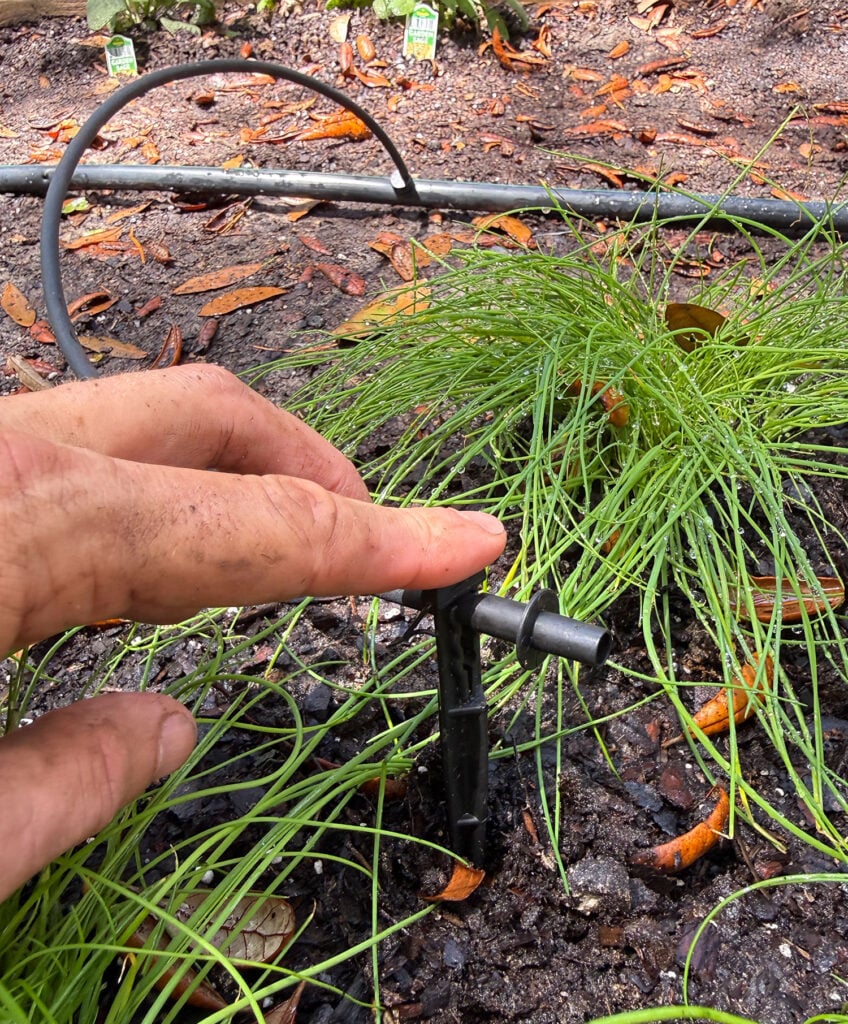
End off any of those driplines with a tube stake that can preserve your water working precisely the place you need it.
How To Appropriate Errors
Oops, you poked a gap within the fallacious place? Don’t fret! The package comes with a number of “goof plugs” which can be utilized to plug up the top of 1/4″ tubing or any small holes you make in your essential line. If the opening is just too massive for a goof plug, you could want to chop the dangerous part out and use couplings to put in a bit of latest hose.
One warning, although. When you place any barbed finish into the 1/4″ tubing, it may be powerful to take away. You could simply want to chop off the errant piece and use one other. Nothing is just too sophisticated although. I made loads of errors and was in a position to have an important working system by the top of some hours. Actually, you are able to do this. It’s the other of rocket science.
Step 7: Take a look at & Program Timer
After you have your entire driplines and emitters in place, it’s time to show in your water and take a look at your system. Use this take a look at run to:
- Verify for leaks close to your hose bib or in any of your strains. Tighten connections to repair any.
- Be sure all emitters are dishing out correctly. Sprayers and bubblers could must be twisted open to work.
- Refine placements and spray patterns. Be sure water is reaching the locations you supposed. Regulate bubblers and sprayer heads to alter spray distances.
- Search for overlap or overspray. Transfer or modify spray patterns if areas are getting watered by a number of emitters. Attempt to restrict overspray on sidewalks, driveways, fences, and siding.
As soon as you might be pleased with every part, take a second to program your timer. It’s usually higher to do 1 or 2 deep waterings per week (versus quick each day waterings). Deep waterings that soak the soil encourage stronger, extra drought-tolerant roots.
Step 8: Dig In or Mulch Over (Optionally available)
Lastly, you could select to dig in or apply a layer of mulch (or soil) atop your hoses. That is optionally available and purely for aesthetics, though some protection can defend hoses from injury. Simply be warned that burrowing rodents like moles could chew by way of buried strains searching for water. And buried strains could also be tougher to identify leaks in and restore. So typically, a skinny layer of mulch is an efficient compromise.
Extra Backyard DIY Initiatives
Need extra concepts to improve or keep your out of doors areas? Listed below are another posts you would possibly get pleasure from:
*This put up comprises affiliate hyperlinks, so we could earn a small fee if you make a purchase order by way of hyperlinks on our web site at no further price to you.

